Automating Network Mastering Scenarios for Amazon VPC with Ansible
Introduction
For a long time, Amazon Web Services has been one of the most often used platforms to deploy and run new projects. For more complex projects, you usually start with mastering your network infrastructure. Fortunately, Amazon provides a definitive guide to most-used network topologies. You can review some at http://docs.aws.amazon.com/AmazonVPC/latest/UserGuide/VPC_Scenarios.html.
For some reason, in most of cases I’ve seen, a customer always configures the setup manually, and then document steps with screenshots in a project wiki. Then, after some time, the original knowledge gets lost and moving or deploying application again leads to careful manual steps.
In this article, I will demonstrate how I automate network creation with Ansible for applications according to project requirements, and store the network creation logic alongside a project. This way, your project infrastructure evolves and releases together with your application releases.
Background
For the demo, let’s choose a more complex setup, as described here VPC with Public and Private Subnets (NAT).
Let’s take a look at the definition, and network topology picture:
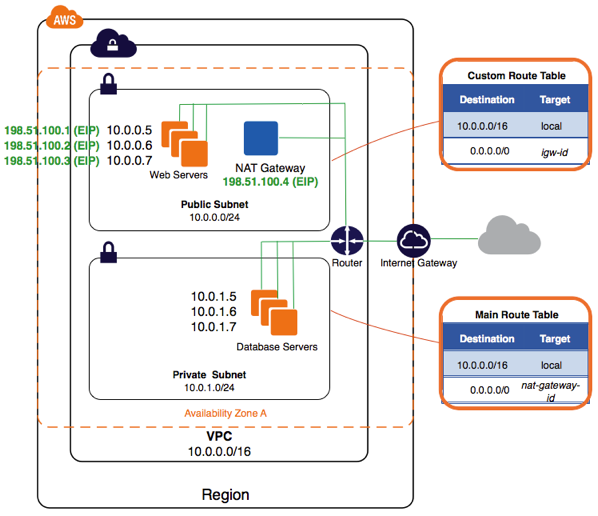
network topology
The configuration for this scenario includes a virtual private cloud (VPC) with a public subnet and a private subnet. We recommend this scenario if you want to run a public-facing web application, while maintaining back-end servers that aren’t publicly accessible. A common example is a multi-tier website, with the web servers in a public subnet and the database servers in a private subnet. You can set up security and routing so that the web servers can communicate with the database servers.
The instances in the public subnet can receive inbound traffic directly from the Internet, whereas the instances in the private subnet can’t. The instances in the public subnet can send outbound traffic directly to the Internet, whereas the instances in the private subnet can’t. Instead, the instances in the private subnet can access the Internet by using a network address translation (NAT) gateway that resides in the public subnet. The database servers can connect to the Internet for software updates using the NAT gateway, but the Internet cannot initiate connections to the database servers.
Let’s implement a bit more sophisticated example than what was described: make an application highly available by placing the app servers in multiple subnets. Thus, in the public subnet we will have an Elastic Load Balancer that would be linked to several subnets we create.
In our scenario, we will use both functions from Ansible AWS module, and
direct awscli commands, where Ansible does not yet support.
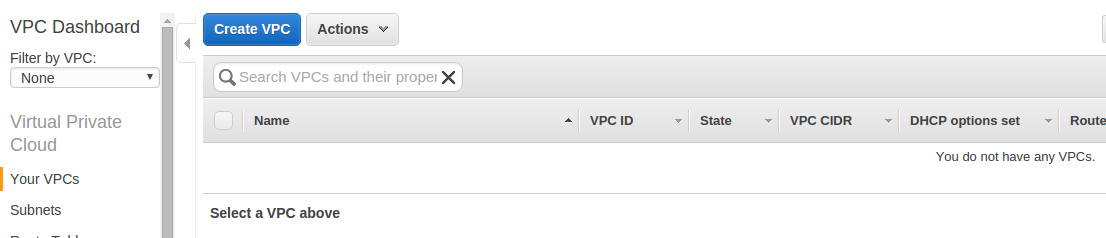
At the beginning, we would have no VPC in our account:
Define VPC
Presequities
As regions have difference in availablility zones sets, let’s create two constants to fix available AZ zones names for provisioning + provide some reasonable name for the environment.
---
  vpc_availability_zone_t1: b
  vpc_availability_zone_t2: c

  readable_env_name: "app-{{env}}"
Structure
Let’s define VPC according to the Scenario 2 picture. To be as close to the Amazon example as possible, I would make 0.0 & 2.0 subnets public, and 1.0 and 3.0 private; As you can see in VPC configurations, we already provide handy readable naming and tags. For two public networks, we specify default routing table.
vpc_cidr_block: 10.0.0.0/16
vpc_subnets:
  - cidr: 10.0.0.0/24
    az: "{{aws_region}}{{vpc_availability_zone_t1}}"
    resource_tags: {"Name": "{{readable_env_name}}-sb-pub-{{aws_region}}-{{vpc_availability_zone_t1}}",  "Environment":"{{readable_env_name}}", "AZ" : "{{vpc_availability_zone_t1}}" }
  - cidr: 10.0.2.0/24
    az: "{{aws_region}}{{vpc_availability_zone_t2}}"
    resource_tags: { "Name": "{{readable_env_name}}-sb-pub-{{aws_region}}-{{vpc_availability_zone_t2}}", "Environment":"{{readable_env_name}}", "AZ" : "{{vpc_availability_zone_t2}}" }
  - cidr: 10.0.1.0/24
    az: "{{aws_region}}{{vpc_availability_zone_t1}}"
    resource_tags: {"Name": "{{readable_env_name}}-sb-priv-{{aws_region}}-{{vpc_availability_zone_t1}}",  "Environment":"{{readable_env_name}}", "AZ" : "{{vpc_availability_zone_t1}}" }
  - cidr: 10.0.3.0/24
    az: "{{aws_region}}{{vpc_availability_zone_t2}}"
    resource_tags: { "Name": "{{readable_env_name}}-sb-priv-{{aws_region}}-{{vpc_availability_zone_t2}}", "Environment":"{{readable_env_name}}", "AZ" : "{{vpc_availability_zone_t2}}" }

vpc_internet_gateway: "yes"
vpc_route_tables_public:
    - subnets:
       - 10.0.0.0/24
       - 10.0.2.0/24
      routes:
       - dest: 0.0.0.0/0
         gw: igw
Creating the VPC
To create the VPC, we use already available Ansible module, ec2_vpc;
On run we provide parameters to it using setup above.
- name: NETWORK | Create the VPC
  ec2_vpc:
    state: present
    region: "{{ aws_region }}"
    resource_tags:
        Environment: "{{ readable_env_name }}"
        Name: "{{ readable_env_name }}-vpc-{{aws_region}}"
    cidr_block: "{{ vpc_cidr_block }}"
    subnets: "{{ vpc_subnets }}"
    dns_support: true
    dns_hostnames: true
    internet_gateway: "{{ vpc_internet_gateway|string }}"
    route_tables: "{{ vpc_route_tables_public }}"
    wait: yes
  register: vpc
Upon this part’s execution, we will have VPC created alongside with subnets:
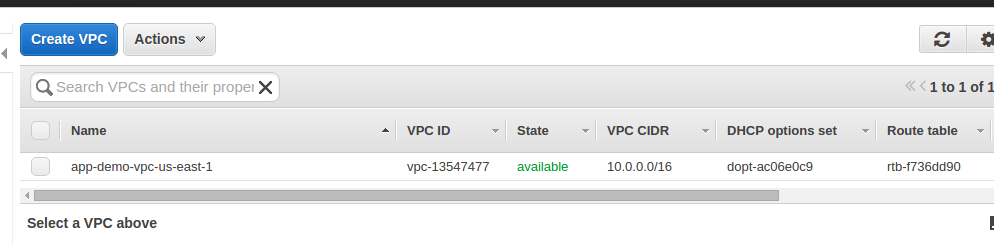
photo
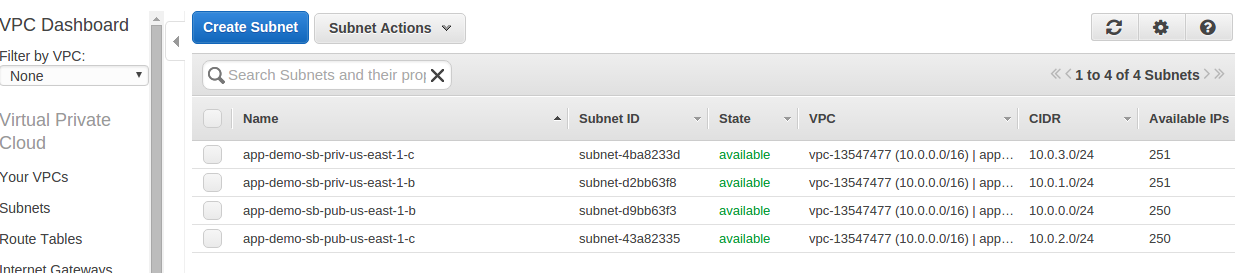
photo
Take a look on Nat gateways created - as you see, we have 1 Nat gateway per public subnet.
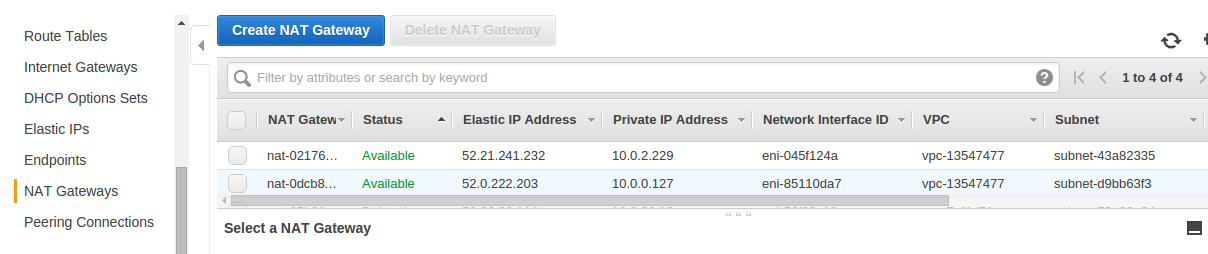
photo
Take a look at the route table created. As you see - public subnets have internet gateway set,

photo
while a private subnet has a route entry that forwards outgoing requests through NAT.
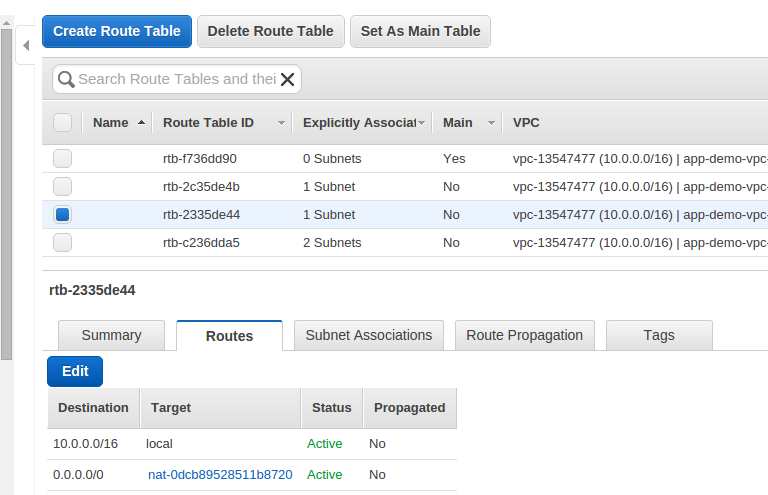
photo
NAT instances magic
- allocate elastic IP
- create a NAT gateway and associate the NAT gateway with subnet
- wait for the NAT gateway to be partially available to create a Route table for the private subnet.
- create a route table for private subnet & set NAT gateway for outgoing traffic
ec2_eip.- name: NETWORK | allocate a new elastic IP without associating it to anything - 1
ec2_eip: in_vpc=yes reuse_existing_ip_allowed=yes state=present region="{{aws_region}}"
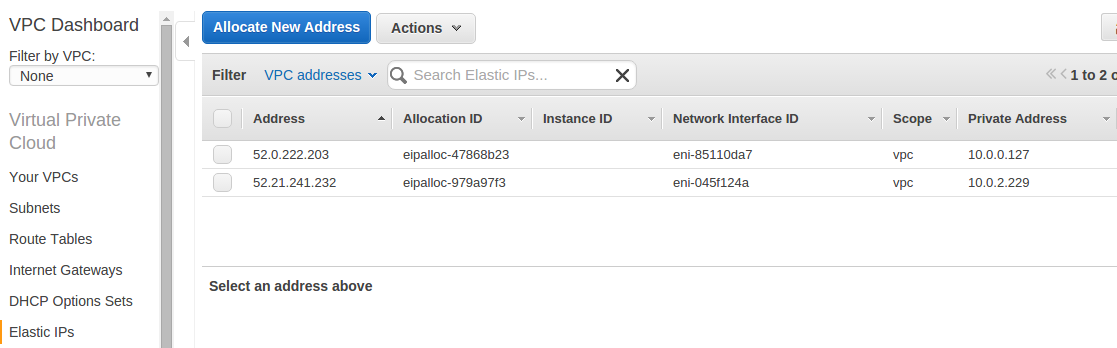
photo
In order to create a NAT gateway, in Ansible v1 we have to use
awscli:
- name: NETWORK | Create NAT instance for subnet 1
  shell: "aws ec2 create-nat-gateway --region {{aws_region}} --subnet-id {{aws_vpc_pubsubnet1_runtime}} --allocation-id {{aws_vpc_privsubnet1_allocation}}"
Here little hack: if you need immediately use NAT gateway, for example, to create a custom routing table. Give AWS time to partially initialize and register it:
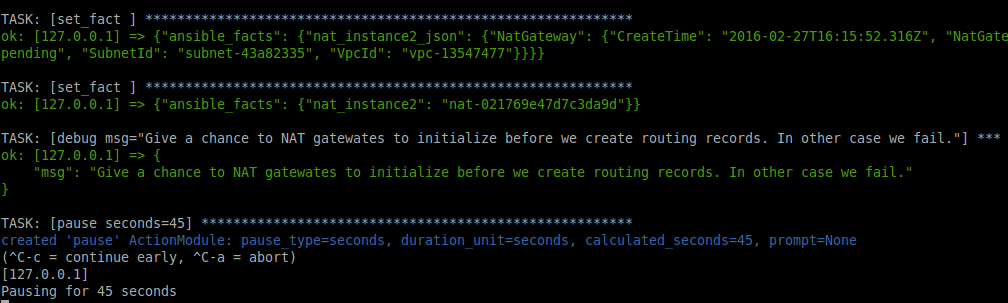
photo
Now we can create custom route tables:
- name: NETWORK | Create new route table for the private subnet 1
  shell: "aws ec2 create-route-table --region {{aws_region}} --vpc-id {{aws_vpc_id_runtime}}"

- name: NETWORK | Associate route table with private subnet 1
  shell: "aws ec2 associate-route-table --region {{aws_region}} --route-table-id {{routetable_private_1}} --subnet-id {{aws_vpc_privsubnet1_runtime}}"

- name: NETWORK | Create NAT route record for  private subnet 1
  shell: "aws ec2 create-route --region {{aws_region}} --route-table-id {{routetable_private_1}} --destination-cidr-block '0.0.0.0/0' --nat-gateway-id {{nat_instance1}}"
Security groups
We can define requirements for security groups alongside with firewall rules. Pay attention to the examples below, especially how you can create rule both for CIDR block and for specific security group(s)
In this example, I want to have four security groups.
- For the load balancer, which accepts
httpandhttps. - For the jump box in a public subnet, so I can
sshto that box, andping,login, andtroubleshootmy application instances. Thus I need to open SSH and ICMP on app servers from that box. - For the Jump box itself, as I want to limit access to the Jump box from my office IP only (assuming your gateway has the public ip address 1.2.3.4)
- For my database box, usually RDS. Assuming we use MySQL - I need to open 3306 port from APP servers.
vpc_security_groups:
  - name: "{{readable_env_name}}-public-LOADBALANCER"
    desc: "security group for public access"
    rules:
      - proto: tcp
        from_port: 80
        to_port: 80
        cidr_ip: 0.0.0.0/0
      - proto: tcp
        from_port: 443
        to_port: 443
        cidr_ip: 0.0.0.0/0

  - name: "{{readable_env_name}}-public-JUMPBOX"
    desc: "security group that allows access from dedicated jump box in public network to internal resources"
    rules:
      - proto: tcp
        from_port: 22
        to_port: 22
        cidr_ip: "1.2.3.4/32" #Your office private ip

  - name: "{{readable_env_name}}-private-APP"
    desc: "Network for internal app servers"
    rules:
      - proto: tcp
        from_port: 22
        to_port: 22
        group_id: "{{readable_env_name}}-public-JUMPBOX"
      - proto: tcp
        from_port: 80
        to_port: 80
        group_id: "{{readable_env_name}}-public-LOADBALANCER"
      - proto: tcp
        from_port: 443
        to_port: 443
        group_id: "{{readable_env_name}}-public-LOADBALANCER"
      - proto: icmp
        from_port: -1 # icmp type, -1 = any type
        to_port:  -1 # icmp subtype, -1 = any subtype
        group_id: "{{readable_env_name}}-public-JUMPBOX"

  - name: "{{readable_env_name}}-private-DATABASE"
    desc: "resources that are private"
    rules:
      - proto: tcp
        from_port: 3306  # MYSQL
        to_port: 3306
        group_id: "{{readable_env_name}}-private-APP"
Don’t you find setup readable from definition? I do.
Let’s check setup created:
List of security groups created:
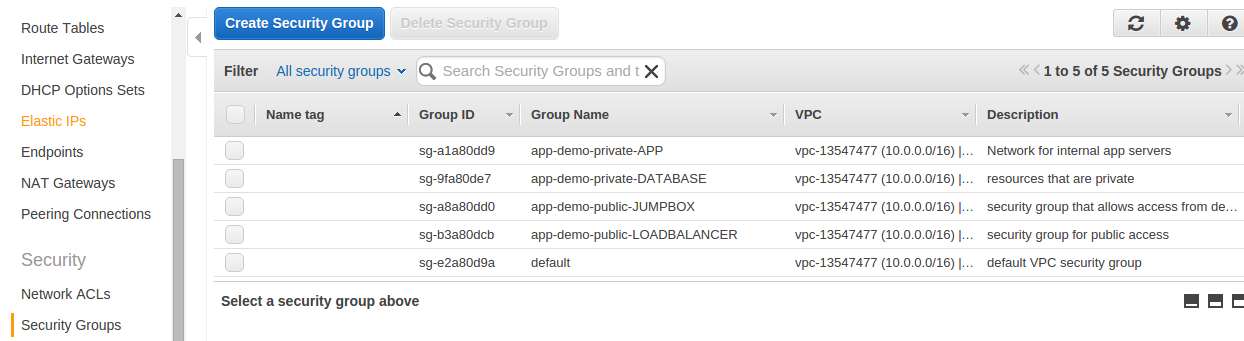
photo
Public security group with inbound rules:
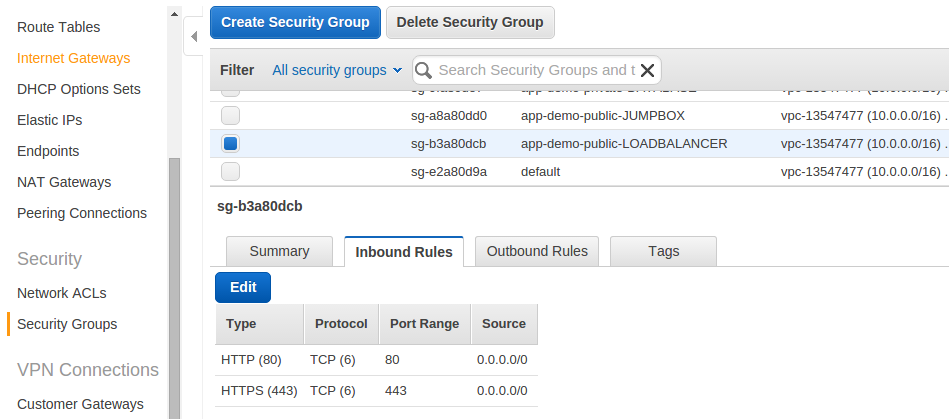
photo
Private app servers group with inbound rules:
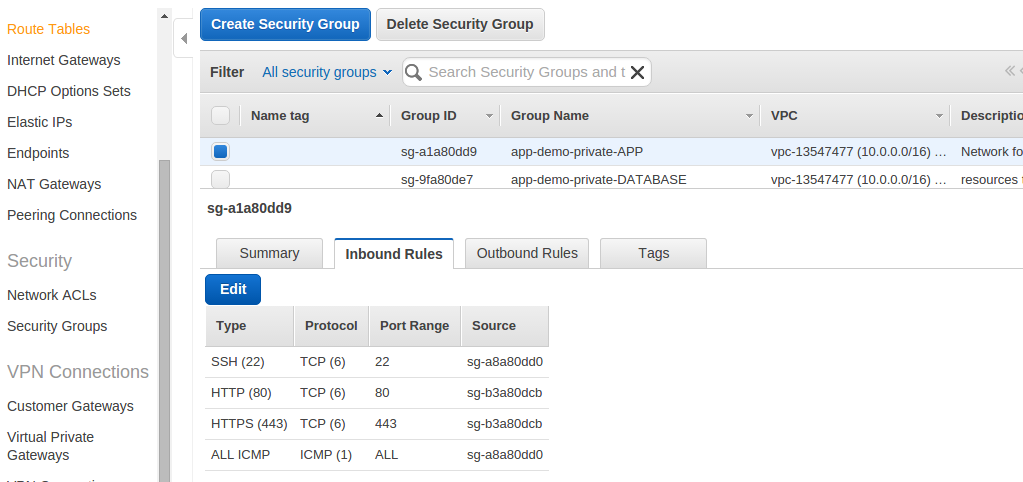
photo
Database access security group with inbound rules:
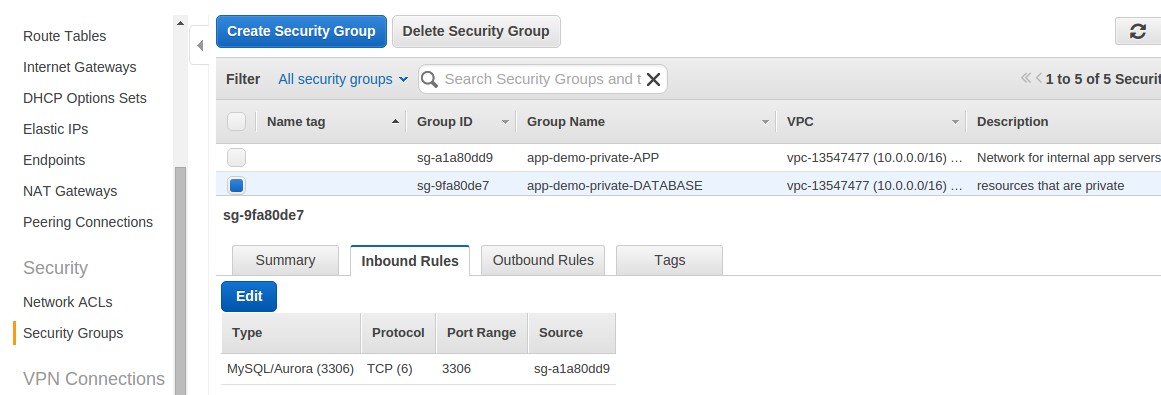
photo
Jump box security group with inbound rules:

photo
Running the Provisioning
Running Ansible provisioning is as easy as executing the shell file of the structure below.
As you see, we specify an environment name (demo), desired region to create VPC in (us-east-1), and set your secure AWS credentials as environment variables for provisioning.
#!/bin/sh

# Static parameters
WORKSPACE=$PWD
BOX_PLAYBOOK=$WORKSPACE/bin/network_create.yml
BOX_NAME=awsnetwork

echo $BOX_NAME

prudentia local <<EOF
unregister $BOX_NAME
register
$BOX_PLAYBOOK
$BOX_NAME

verbose 4

set env demo
set aws_region us-east-1

envset AWS_ACCESS_KEY_ID THISISVERYSECUREKEYID
envset AWS_SECRET_ACCESS_KEY ANDTHISISTHISISVERYSECUREKEYACCESSKEY

provision $BOX_NAME

unregister $BOX_NAME
EOF
Wondering how long it will take? Less then 1 minute. Compare to manual setup ....
PLAY RECAP ********************************************************************
127.0.0.1                  : ok=42   changed=12   unreachable=0    failed=0
In the end, you will have all the information about the network you created, so you can store it, or template it to some configuration file:
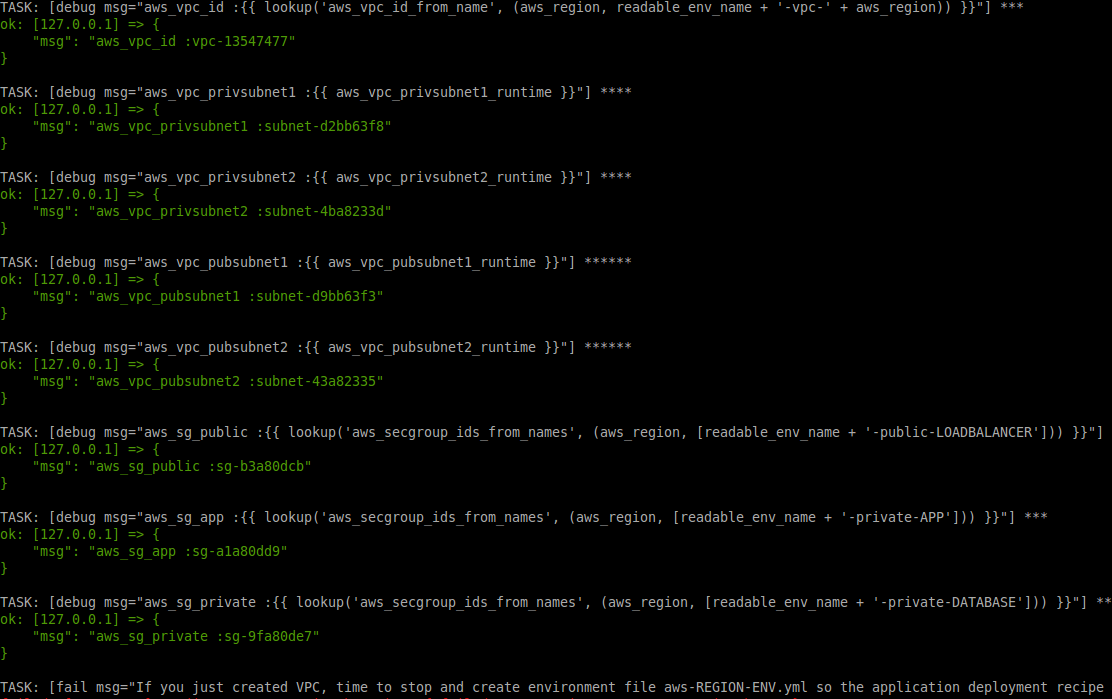
photo
Points of Interest
I recommend to store and evolve deployment and provisioning recipes with your application code. Believe me, when you know that you can set your environment up from scratch in 10-40 minutes, your customer will be less nervous :)
If you use that approach to implement different cases of network setups, I would be grateful if you shared your experience. If you need to implement continuous integration to your project - you are welcome.
Mentioned samples for use with Ansible v1 (1.9.4) could be seen on or forked from GitHub.